Author Topic: Ready for some BLOOD BOWL? (Chaos Edition is on sale for 7.50 until 7/17!)  (Read 1808 times)

AndrewRogue

  • Infinite
  • DL
  • Denizen
  • *
  • Posts: 3079
  • Sadness
    • View Profile
Hello and welcome! Welcome to the Official DL Blood Bowl Topic! I'm your host, Andrew Rogue, and I'm here to tell you a bit about Blood Bowl!

So what is Blood Bowl, you might ask? Blood Bowl is a tactical, turn-based football like game that is set in the Warhammer Fantasy universe. Its a game of elves throwing deep passes right before an orc comes by, kicks 'em in the codgers and den stomps dat squishy elf good! Its a game where werewolves on the line of scrimmage tear up dwarven blockers. Its a game where a troll picks a goblin ball carrier up to toss him in the endzone... or maybe to have a little snack.

The PC game is actually a mostly completely faithful adaptation of the miniatures game by Games Workshop (excepting Blitz Mode, but we won't talk about that). So if you like some combination of fantasy, football and board games, then you may very well like Blood Bowl.

Conceptually, the gameplay is pretty simple. Two teams are arranged on the pitch, one kicks, the other receives and the players take turns meanuvering, blocking, throwing, handing off or, if you can't be bothered with all this wussy ball carrying and trying to win by scoring, incapacitating or killing off the other team. The game is heavily dice based with d6+mod rolls determining the outcome of most actions, so an ability to estimate successes and roll with the punches when Nuffle (patron diety of Blood Bowl) starts being uncooperative.

The most common style of play for Blood Bowl (to my knowledge) is League Play which is basically a season of Blood Bowl. You buy players, level them up through play to improve their abilities and then swear endlessly when that git you're playing fouls your best player and kills him mid-League. >:| You'll be crying "Blood for the Blood God!" before you know it!

The version of the game we are playing is Blood Bowl: Legendary Edition (the newest one) and features ~20 teams ranging from the stocky, slow moving (but very stable) Dwarves to the nimble, passing oriented Wood Elves to the brutal forces of Chaos (who can't pick up the ball to save their lives, but hit like trucks) to the weedy Goblins (who are all cheap, fragile and very, very expendable). There's a small handful of players in the DL right now and we're trying to recruit! If you're interested, the game is available on Steam and Amazon and tends to go on sale with some frequency.

We currently have an open League for exhibition games (DL League, pass: RPGDL) and if we can get some players, we're looking into a more organized League. If you have any questions, feel free to ask.

With that, I'm gonna pass the mic on over to Yakko who has some advice for aspiring Blood Bowl coaches (advice to players would be wasted, since the majority of them don't have the capacity for rational thought left!).
« Last Edit: July 15, 2014, 06:36:29 AM by AndrewRogue »

Yakumo

  • DL
  • Denizen
  • *
  • Posts: 1935
    • View Profile
Re: Are you ready for some BLOOD BOWL? (Official DL Blood Bowl Topic)
« Reply #1 on: November 30, 2011, 06:00:09 PM »
I'm just going to put this out here right away so there's no misunderstandings.  I love this game but it has a pretty nasty early learning curve.  Your first few games it's probably going to feel like nothing is going right and it can be quite frustrating.  I'm going to try and give you some information on the basics of play, enough to get you playing and competitive.  Once you get over the initial hurdle, the advanced stuff is much easier to pick up as you go.  I apologize, but this is going to be somewhat long winded.  I'll explain some basics about stats and actions in this first post, then I'll cover a few basic strategies in the next one.  I'm also going to suggest that new players go through the tutorial inside the game so you can pick up the controls and you know how to do the different actions I'm talking about.

Most of the information in this post can be found in the Living Rulebook, the freely available rulebook for the Blood Bowl tabletop game.  You can download a copy of it here if you would like to look it over for yourself.  The computer game is very faithful to the tabletop rules except for the Chaos Dwarf teams not being included.

The first and most important thing to realize about Blood Bowl is that almost every action you can take is controlled by the roll of six sided dice.  No matter how many skills you have on your players, how well you plan out your moves, or how weak your opponent seems to be, there is always the chance of failure.  Your job is to minimize the chance of failure, but also to be prepared for when, not if, things go wrong.

There are a few basic rules you need to know about before we can even get to actions you take during a game.  One of the most important is the concept of "tackle zones".  For the most part, a player who is standing creates tackle zones in all eight of the spaces immediately adjacent to them.  There are occasional exceptions but those are more advanced rules, you generally won't see them happen in early play.  Tackle Zones have a very large influence on many actions, so understanding where they are is essential.


Turnovers mean something slightly different in Blood Bowl than in American Football.  A Turnover happens when the team whose turn it is fails a skill roll.  It instantly ends that player's turn and the other team gets to take their turn.  Needless to say, you want to avoid these at virtually all costs.

All players have four stats.  MA is Movement Allowance.  This number is the number of squares the player can move in a turn with no penalty.  It is possible to Go For It and try to move up to two more spaces, but each additional square requires a roll.  If the roll is a 1, the player falls in the square they were moving to and there is a Turnover.  ST is Strength.  This is mostly used to determine the results of a block, though in certain cases it can also be used for a skill roll.  AG is Agility.  This is usually the stat used for skill rolls, which are explained later.  Finally, AV is Armor Value, which is a measure of how hard your player is to hurt when they get knocked down.  When a player is knocked down, you roll two dice.  If the result is higher than the AV, the player is injured.  Since it's 2d6, each point is a significant upgrade in survivability.

The only actions which do not require dice rolls are moving players who are not next to opposing players, and standing up players who have been knocked down.  Since these are the only moves which have no risk, in most cases you should do them first.  No die roll is required to move up next to an opponent, but if you are standing in an opponent's tackle zone and try to move away you will need to make a roll to avoid getting knocked down.  All other actions have different amounts of risk depending on the skills and statistics of your players.

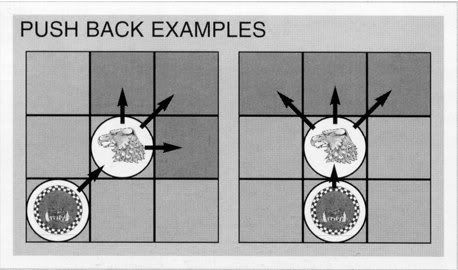
One of the most common actions for many teams is the Block, where you attempt to knock your opponents down and out of the play.  However, this is also one of the most complicated actions you can take.  Several players on each team could be involved in a single Block action.  To determine the result, a number of block dice(1-3 depending on circumstances) are rolled and one of them is chosen as the result of the block.  The possible results are as follows:

Blue Arrow(2 faces) - Push.  The defending player is pushed back a space but is not knocked down.  In most cases the attacking player chooses which of the three squares behind the defender they are moved to.  There are skills which can affect this but they're a bit more advanced than what I'm covering here.

Yellow Starburst - Defender Down.  The defending player is pushed backward as with the push die, but they are knocked down in the square they end up in.  An armor roll is made to see if the player is injured, which will be explained later.

Yellow Starburst with ! in the middle - Defender Stumbles.  This face has two possible effects.  If the defending player has the Dodge skill, it functions like Push.  If the defending player does not have Dodge, it functions as a Defender Down result.

Red Skull - Attacker Down.  The attacking player is knocked down in the square they are currently standing in.  This causes a Turnover and an armor roll.

Red Skull and Yellow Starburst - Both Down.  This basically combines Attacker and Defender Down results, unless one or both players has the Block skill.  If they don't have Block, both the attacking and defending player are knocked down in the square they are currently in.  If either of them has Block, they are not knocked down and do not move.  This result causes a Turnover if the attacking player does not have Block.  If they do have Block, however, their turn can continue.


We'll start with the simplest possible Block, two players starting next to each other with no other players nearby.  In this case, the number of dice rolled and the player who picks the result are determined by the Strength stat of the players.  If the two players have equal strength, one block die is rolled and whatever comes up happens.  If the attacking player has more strength than the defender, two block dice are rolled and the attacker gets to pick a result.  If the defending player has more strength, two dice are rolled but the defender picks the result.  If one player has at least twice the strength of the other, three dice are rolled and the player with the higher strength picks the result.

Other nearby players can influence the roll by assisting the block.  You don't have to tell them to do this, if the criteria are met they will automatically assist.  Other players can assist the attacking player if the defending player is in one of their tackle zones, and they are not in any other opposing players' tackle zones.  Players on the other team can assist the defending player if the attacking player is in one of their tackle zones, and they are not in any other opposing players' tackle zones.  This is a difficult concept to explain in words so please refer to the diagram below.


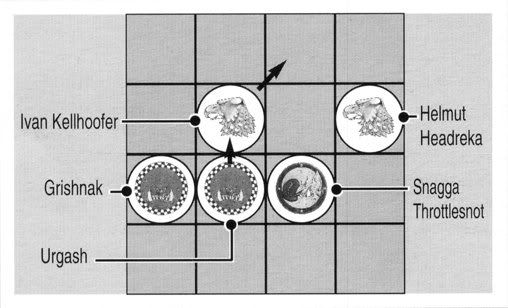
In this example, Urgash is throwing a block against Ivan Kellhoofer.  He is able to get an assist from Grishnak, because Grishnak has a tackle zone on Ivan and no other opponent has a tackle zone on Grishnak.  Snagga Throttlesnot, however, cannot assist.  He does have a tackle zone on Ivan, but he also has a tackle zone on him from another player, Helmut Headreka.

If this block were being thrown by Snagga Throttlesnot instead, every player in the diagram would be involved in the block.  Helmut has a tackle zone on Snagga, and Grishnak and Urgash have a tackle zone on Ivan.  None of the players are in another opponent's tackle zone.

Every player who can assist the block adds one to the effective strength of their team's player to determine the number of dice to roll for the block.  For example, if a player with three strength is blocking a player with four strength, normally two dice would be rolled and the defender chooses the result.  If one player assists the player with three strength, they effectively have four strength for the block and a single die is rolled.  If two players are able to assist, the effective strength becomes five and now it is two dice, attacker chooses. 

The Blood Bowl game will do all these calculations for you and show you the result before you even start the block.  If you're confused as to why a result is what it is, you can right click once on the player you are blocking and the game will highlight all players that would be assisting that block.  Right clicking a second time will execute the block, so be careful.

For other actions besides Block, the result is determined by roll of a standard six-sided die.  The odds of success depend on the character's stats, usually Agility.  The base chance of success is determined by this table:

RELEVANT STAT:     1     2     3     4     5     6
SUCCEEDS ON:        6+   5+   4+   3+   2+   1+

For example, if the stat the action is based on is a 3, you need to get a result of 4 or higher to succeed at the action.  All actions have modifiers that make them more or less likely to succeed.  Players also have skills that can have an effect on certain skill rolls, though in most cases it just provides a free reroll if the first roll fails.  I'll give a brief rundown of some of the more common actions and modifiers.

Dodging is the action of moving when you are in an opponent's tackle zone.  This requires a roll based off the Agility stat.  You get a +1 modifier for attempting the action.  There is also a negative modifier based on the number of opposing tackle zones covering the space you are moving to.  It does not matter how many tackle zones are in the space you are leaving.  If the roll succeeds, you move to the next square and can continue with your move.  If you end up in another square with a tackle zone, however, you would have to make another dodge roll to leave that one as well.  If you fail a dodge roll, your player is knocked over in the square they were moving to and there is a Turnover.

Picking up the ball is also an Agility roll.  There is a +1 modifier to the roll for attempting a pick up, and a negative modifier based on how many opposing tackle zones are covering the ball.  You must attempt to pick up the ball if you move into the same square as it, so you can't run a player over the ball to assist a block and then have someone else pick it up.  If you succeed at the roll, your player picks up the ball and can continue with their turn.  If they fail, the ball will randomly scatter into any of the eight adjacent squares.  If a player is in that square they can attempt to catch it.  If nobody on your team ends up with the ball after a failed pick up, there is a Turnover. 

Passing the ball requires two Agility rolls, one for the passer and one for the receiver if the ball gets to them.  The pass has a modifier based on the distance the ball is being thrown(the game shows you the modifiers when you are highlighting possible receivers) and the number of tackle zones the passer is in.  If the roll is a 1, it is a fumble and the passer drops the ball in an adjacent square.  If the roll succeeds, it is an accurate pass and goes right to the player.  If the pass fails but not critically, it is an inaccurate pass.  The game will calculate where it ends up and it is still technically possible for it to get to the receiver, but this is unlikely.  Catching is an agility roll as well.  If the pass is accurate, there is a +1 modifier to the catch roll.  There is also a negative modifier based on the number of tackle zones the catcher is in.  Finally, if there is any opposing players between the passer and the receiver, the opponent can pick one of them to try to intercept the pass.  Intercepting is an agility roll with a -2 modifier, as well as a negative modifier based on the number of tackle zones the player who is attempting the interception is in.  After all that, if any player on the passing team has the ball at the end of the play, their turn continues.  If not, there is a Turnover.

There is one last thing I'd like to explain quick before I move on to the general strategies, and that's the Blitz.  Normally, you can only choose to move a player or make a block with them, not both.  Once per turn, however, you can declare a blitz and allow one player to do both.  The blitz has to be declared before the player moves at all, so make sure you've planned the move out in advance.  The game will automatically declare the blitz for you if you pick the target of the block as the end of your move action, but if you want to throw the block before your move action, you will need to manually declare the blitz by clicking the lightning bolt icon in the UI.  (I'll put a picture in to show what I'm talking about later)

This pretty much covers the basic skills that you will use most of the time.  In the next post, I'll go over a few strategies and basic tips for players.  If any of this isn't clear enough or you have any questions, please feel free to ask me here or in IRC.
« Last Edit: November 30, 2011, 08:34:23 PM by Yakumo »

Yakumo

  • DL
  • Denizen
  • *
  • Posts: 1935
    • View Profile
Re: Are you ready for some BLOOD BOWL? (Official DL Blood Bowl Topic)
« Reply #2 on: November 30, 2011, 06:00:28 PM »
Alright, you know what your players can do on the Blood Bowl field, now you need to know how to put them to use in a game.  This post is going to go over some basic strategies for basic play.  Obviously, you have to modify these a bit based on what your opponent is doing, but these should give you a good foundation to build from.  As you play more, you'll be able to adapt these to suit your style of play.  I'll try and get some pictures in here to illustrate some of this stuff soon.


First, a quick tip about the order you do things.  In general, you want to do the less risky actions first, then build up to actions that have a higher chance to fail.  Start with things that don't require any rolls at all, which is standing up players and moving players who will never be next to an opponent.

Next is actions with a high chance of success(or at least not outright failure).  This means things like blocks where you roll two dice and you pick the result.  If you're blocking with a player that has the Block skill, only one of the six results on the block die are an outright failure, so if you're rolling two dice you only have a 1 in 36 chance to end up with your player in the dirt and your opponent getting a turn.  It's a little trickier without block since two results can end your turn, but the odds are still fairly good.  Also included in this category are skill rolls where your player has the associated skill, such as a dodge with the Dodge skill, which gives you a free reroll if you fail the roll.

Once these are done you move on to riskier options.  Players that need to dodge but don't have the skill, or blocks that you only get one die on.  With this category, failure is a pretty common result, so think carefully about how much you really need to try these and avoid them if you can, or at least only do them if failure doesn't ruin your game plan.

Sometimes, you need to break this order of operations in order to create an easier action for someone else.  For example, you might be able to throw a block with two dice in order to create a space where another player can run without needing to dodge, or you may need to make a dodge away from a player in order to set up an important block.  Keep in mind this is just a general guideline and don't be afraid to alter it as needed.

It's not directly related to the order you do things, but while you're taking actions, be careful about leaving players on the edge of the field.  A player that is blocked off the field will have to roll an injury, and even if it isn't severe they're off the field until the next time a team scores or halftime.


This is why you don't leave players on the sidelines.  The fans may be more vicious than the opposing team!


When you have the ball, your number one priority is to protect your ball carrier long enough for them to get to the end zone.  One of the most common and effective ways to do this is to form what's known as a 'cage' around the ball carrier.  In a perfect situation, a cage is formed with the ball carrier in the center and one player in each square diagonally adjacent to the player, with none of the players in the cage adjacent to an opponent.

Because of the way tackle zones and dodging work, what this does is make it difficult for the opposing team to hit the ball carrier directly.  They would need to make a dodge into three tackle zones just to get next to the ball carrier, and then would have to make a block roll on them.  Usually, all they can do is blitz one of the corner players and then try to move other players next to the ball carrier to make it harder for you to take actions, but the other members of the cage will still be nearby to help push them off so you can keep moving down field.


These pictures show a cage and the reason that a cage is useful.  Moving to the red space would require a Dodge roll with a -3 modifier for tackle zones, and the members of the cage can assist the block.  It would be possible to put other players in position to remove the assists, but the Dodge would still have to be made.


On a similar note, overlapping tackle zones is also one of the key parts of playing defense.  Obviously you don't have enough players to make a solid wall to stop your opponents, but what you can do is stagger them so that every hole in the line is covered by at least one tackle zone.  This way, in order to get past your players, they have to make several rolls, and every roll you make your opponent make is a chance for them to fail and be forced to end their turn.


Looks like there's room to run between those two players, but because of their tackle zones, there really isn't.  The squares marked in red mean that a die roll is required to make that part of the move, and you can see what happens when you don't make that roll.

Another important thing to think about on defense is what I call marking players.  Basically, this means moving another player right next to an opponent.  What this does is forces them to either roll dice to move away from you, or block your player and not be able to move at all.  You don't necessarily want to do this with every player, though.  Weigh the benefits of slowing them down against the possibility of getting punched in the face, and think about how much it matters if they do move.  If you don't want to be right next to them, being a space or two in front of them so they have to detour around can be helpful too, especially if there's other tackle zones nearby.


When the ball is loose but you don't have a player with good ball handling skills/stats nearby to pick it up, you can still at least make it harder for your opponent to get it.  Box it in with your players and the opponent has to bash their way in or make dodge rolls at bad odds.  Also, remember that every tackle zone you have on the ball is -1 to the other team's roll to pick it up, so even if you can't box it in completely you can still protect it somewhat.  It's also not a bad idea to set up this protection before you try to pick up the ball if you do have a ball handler nearby to make failure less devastating, since it's possible another player could end up catching it or at least you would have tackle zones on it to make it harder for the other team.  As a bonus, if you do pick up the ball you already have the start of a cage.


As you play the game with the same team, your characters will build up Star Player Points, which are essentially XP for this game.  Once you get enough SPP, your player levels up and can learn new skills, or if you're lucky with the roll they can get a stat boost.  Yes, even leveling up is partly at the whim of the dice.  I'm going to go over a few of the most common early picks for skills, what they do and why you may want them.

We'll start with one of the most powerful pairs of skills the game has, Block and Dodge.  These skills don't seem like they have a huge impact on the game at first glance, to be honest, but when you take a look at the block die you'll realize that having both these skills increases your players' ability to survive by a large amount. 

A skill-less player being hit by a block has three results on the block die that can knock them down, and therefore have the potential to injure them.  Defender Down, Defender Stumbles, and Both Down.  However, if you have the Dodge skill, Defender Stumbles no longer knocks you down, it only pushes you back.  If you have Block, Both Down no longer knocks you down, it leaves you standing in the square you're in.  Therefore, if you have both of these skills, your chances of getting knocked down and potentially losing the player go from 50% down to about 17%.  Block also makes throwing blocks safer, and Dodge gives you a second chance to roll a dodge roll if you move away from your opponent, leading to even fewer chances to lose the player.

Another fairly common skill you'll see is the Guard skill.  A player with the guard skill can assist on blocks even if they're in another player's tackle zone.  Having a player with Guard around makes your other players have an easier time blocking the opponent.  You don't need too many players with this, but it's handy to have, especially on players who are going to be on the line of scrimmage at the beginning of a drive.

Another common skill choice are the reroll skills that fit to certain positions.  This includes skills like Sure Hands for picking up the ball, Pass for throwing it, and Catch for catching the ball.  What these skills do is give you a free reroll of their specific skill roll if you fail it the first time, without having to use one of your team-wide rerolls.  Keep in mind that these skills won't automatically make a player good at something, they only give you a second chance.   A player with an agility score of one is still not going to have much luck picking up the ball even with Sure Hands. 

There are a lot of other skills out there, these are just some of the more common ones you'll run into.  If you see a player with a skill you don't know, you can just hover over the name of the skill to see what it does.  You can also do that during level ups to help you make your decision.  If you want more information about how certain skills work, feel free to ask.


One last thing I'm going to go over before I'm done, and that the team selections.  The different teams have different ways to play them, and it would be difficult for me to give you a good rundown of all of them quickly.  What I will do is tell you which teams not to start with.  Some of the teams are really gimmicky and are intended for fun or to give yourself a challenge, they aren't really suited for a beginner.  These are Halflings, Goblins, Ogres, Vampires, and to a lesser extent Nurgle.  Some of the other teams are harder to start with than others, but they're competitive in their own specialty.  If you really don't know what to pick to start out with, my personal suggestion for a beginner's team is Orcs.  Orcs lean toward hitting and running with the ball more than passing, but they can pass if they need to and their players have good, solid skills.

Hopefully this information can help you get started playing the game.  Don't get discouraged if things don't work out for you at first.  The more you play, you'll start to recognize what works and what doesn't, especially if you switch the chat window in the lower left to show the dice rolls because the game is very transparent about what the modifiers for any given action are when it makes the rolls.  Also, if anything is confusing you feel free to ask in here or in IRC and we'll do our best to help you get on the right track.
« Last Edit: December 01, 2011, 04:56:01 PM by Yakumo »

Captain K.

  • Do you even...
  • DL
  • Denizen
  • *
  • Posts: 2176
  • ...lift books bro?
    • View Profile
Re: Are you ready for some BLOOD BOWL? (Official DL Blood Bowl Topic)
« Reply #3 on: November 30, 2011, 11:48:21 PM »
Hmm, I used to play the board game, but my gaming plate is pretty full right now.  Don't think I want to start a league of anything at the moment.

And yes, halflings are terrible.  Which is why they are awesome.

Yakumo

  • DL
  • Denizen
  • *
  • Posts: 1935
    • View Profile
Re: Are you ready for some BLOOD BOWL? (Official DL Blood Bowl Topic)
« Reply #4 on: December 03, 2011, 06:23:55 AM »
Andy found a website,  http://bbtactics.com/, which has some strategies for Blood Bowl.  It's based on the board game but most of the stuff would apply just the same to the PC game, aside from stuff about Chaos Dwarves.  I haven't done more than glance at it myself but it might be worth a look for people just starting out.

AndrewRogue

  • Infinite
  • DL
  • Denizen
  • *
  • Posts: 3079
  • Sadness
    • View Profile
Re: Are you ready for some BLOOD BOWL? (Official DL Blood Bowl Topic)
« Reply #5 on: July 13, 2014, 10:23:05 PM »
Booting this up to the front, 'cause we're finally getting ready for some DL League action and this is way more helpful than making a new topic.

So far interested players are myself, Sopkins, VSM, and Yakko. We could definitely use some other interested players. If a ton of people want to try but aren't interested in grabbing the Cyanide version we could consider FUUMBL as well, but eh. >_>

AndrewRogue

  • Infinite
  • DL
  • Denizen
  • *
  • Posts: 3079
  • Sadness
    • View Profile
If you are at all interested in Blood Bowl, Chaos Edition (the most up to date version of the game) is on sale for $7.50 until the 17th! Now is the perfect time to get in on the action!

Hunter Sopko

  • Heavily in Debt
  • DL
  • Denizen
  • *
  • Posts: 4556
  • Hai, Kazuma-desu
    • View Profile
dooo iiiiit. Join ussssss