Damage tests all done on Raph since each of his pixels are worth less, meaning it should be easier to estimate precisely how much each attack does.
 Baxter Stockman: "Terminate the Turtles!"
HP: 96
Threshold: 4
Baxter spends a good portion of the battle in the air. As such, he can't be struck by melee attacks. He will eventually land after flying around 4-5 times
Attacks -
Machine gun : 6 damage.
Flyswatter: 12 damage. Once Baxter loses around half his health, he drops the Machine gun in favour for his Flyswatter cannon
Fly: Automatically used after taking 4 hits. Escapes back into the air and becomes unhittable by ground attacks
Comments:
Its the first boss of the game. And he's pretty terrible. There is in fact, a corner where you can stand and Baxter can't even hit you with any of his weapons. At which point you wail on his ass with a big combo. 96 HP falls pretty quickly. Plus he's still vulnerable to other attacks while airborne and has to pause everytime he wants to shoot his gun. BUT OMG DOUBLE DAMAGE LIMIT.
Puny.
 Metalhead: "I'll mangle you green slimeballs!"
HP: 128
Threshold: 5
Attacks -
Punch: 6 damage
Anti-air punch: 6 damage
Double Punch: 9 damage. Can only be used after Punch/Anti-Air punch are both used.
Leaping kick: 6 damage. Automatically used after taking 5 hits as an escape.
Energy Gun: 12 damage. Can only be used after Leaping kick.
Comments:
HP's improved a bit...sorta. In exchange for melee immunity. Which isn't a good trade since everyone's damage goes up if they can use Rush attacks. Probably a losing trade. Anyway, his attacks. Decent enough range to poke out Raph if he's smart, which he means he can also get some damage against Mikey if you aren't careful. Don just laughs at him forever. Other than his punch combos, he's pretty much a non threat. The leaping kicks in particular are somewhat annoying if you're using Raph or Mikey, but Don and Leo don't care ever.
Light Rat king: "First the sewers...then, the world!"
HP: 96
Threshold: 5
This battle takes place over a surfboard, as such, rushing attacks cannot be used.
Attacks -
Energy gun: 9 damage. Fire a small blaster at the centre of his ship. Slow start up. Can knock target down on hit.
Missile: 12 damage. Fires missiles on the side of his craft that have infinite horizontal tolerance
Mines: 6 damage. Spews multiple mines that can hit the player. Can only be used if Backaway was used before.
Backaway: Retreats back "off screen". In practice this tends to get him killed. Read on...
Comments:
Rat King would enjoy his durability of not worrying about dashes more if it wasn't for one little thing. His threshold escape move is basically garbage. Theoretically, he moves off screen and can't be hit while spewing out mines. In practice, if you get into the bottom left corner of his craft and spam attacks, he'll still be struck by all four characters and basically all he will do is keep backing away as you keep triggering his escape counter. And since those mines don't spawn on the corners and he can't use his missiles while in this mode, his realistic durability is 5 hits from anything before blowing up.
Puny.
 Tokka: "Master said have fun...Fun..."
HP: 96
Threshold: 4
Fights together with Rahzar
Attacks -
Freezer Breath: 3 damage. Decent range (around half screen horizontal tolerance)
Crush Jump: 12 damage. Jumps and lands, hopefully on top of you. Invincible during the jump. Significant start up.
Dash Ram: 12 damage. This tends not to hit you normally. Can also hit Rahzar for roughly the same damage I would believe.
 Rahzar:
 HP: 96
Theshold: 4
Fights together with Tokka
Attacks -
Quick Claw: 12 damage. Used as an escape every fourth hit he's struck.
Firebreath: 9 damage. Decent range (around half screen horizontal tolerance)
* Shell Surf: 24 damage. Requires both Tokka and Rahzar to be alive. Rahzar gets on top of Tokka and rides him around the boss arena for 8 seconds or so, during which time they are both invincible. Significant start up time.
Comments:
Not terribly durable individually, and they tend to hit each other a few times due to Tokka's escape maneuver. Shell Surf is basically useless since its sooooooo Slow. Rahzar is the deadlier of the pair since his Quick Claw has good range and good damage, and its far more annoying as a counter. Neither of their breath attacks are terribly strong it seems (at least at full health), but since it has good coverage, one can always hit you with it while you wail on the other. Most of Tokka's attacks are a lot worse if he's by himself since their terribly slow.
Middle if a team,
Light if individually fought
 Shredder: "Tonight, I dine on turtle soup"
HP: 90
Threshold: N/A
Attacks -
Main cannon - 9 damage. Attacks in the targetted spot. Telegraphed attack as the cursor will lock and turn to red when Shredder is about to fire. Takes around 4 seconds before the cursor changes colour. Once locked, cursor will not move and Shredder must fire before utilizing the cannon again
Vicegrip - 15 damage. Uses the claws on the side of machine to grab you. Cannot reach if a turtle if they are standing at the very back of the arena
Summon Foot Soldiers - Creates more foot soliders to enter the battle. Always active. Maximum of 3 Foot Soldiers may be on screen any time. The type of Foot Soldier summoned is dependent on the difficulty level. On Easy, only normal foot soldiers appear. On Normal, Orange Foot soldiers appear and can use Ninja Stars. On Hard, only Armguard Foot soldiers appear (which require you to dash attack before a grab). These are the foot soldiers I have assumed Shredder is summoning

Armguard Foot Soldiers:
HP: 12-16
Threshold: None
Attacks -
Punch - 6 damage. A close range punching attack
Guard - Always active. Blocks most attacks used against them except for Bulldozer/Snake Killer/Cannon Ball/Special Attacks/Attack#4
Comments:
The first somewhat competent boss that may cause you to lose a stock. Anybody who has played the game knows the gimmick in this battle. The only way to damage Shredder is by using the Catapult maneuver and throwing enemy Foot Soldiers into Shredder. Each Foot Soldier thrown this way does 10 damage. Since no Turtle deals more than any other, Shredder always dies in 9 hits. The question is just how long it takes.
The real problem is Shredder's main cannon and the floods and floods of foot soldiers, especially on Hard. On easy and Normal, throwing 9 of them into Shredder isn't a problem, and the only concern ends up being the gun, making it very easy to avoid damage. On Hard, since you have to utilize a Bulldozer (any other attack either knocks down or kills the Foot Soldier), you'll always need to be dashing, and its easy for the enemies to surround you in a bad position, or force you to actually move into his arm grabbing range. Still, that durability means he can only survive for so long, so despite how easy for him it is to pile on damage, he doesn't tend to live long enough for it to cause you concern. Middle.
 Slash: "You're history slimeballs!"
HP: 160
Threshold: *Varies
Attacks -
Slash - 6 damage. Attacks forward with a sword. Decent reach.
Claw - 6 damage. Attacks by swiping his claw. Very Quick
Blanka ball - 15 damage. Rolls into a spiked ball and hits anyone in the same horizontal plane. Used as an escape after 3 hits*. After using it, has a period of cool down where he can be struck.
Guard - Blocks all enemy attacks. Used on frontal attacks. If an attack is blocked, Slash retains Guard stance (simply put, you can't get a second player to move behind him and strike him since he'll block that too).
* Not guaranteed. His threshold seems to be 3 if you're striking him in a corner. In fact, if he's in a corner, he can use the Blanka Ball seemingly at anytime although the general rule is 3 hits before escaping. He can even do this when blocking. On the other hand, if you're not in the corner, he doesn't seem to have a threshold, meaning you can clobber him until you reach one end of the screen.
Comments
Often considered the hardest boss in the game for a few reasons. One would be that varying threshold. This makes it difficult to predict exactly when he's going to use the Blanka ball to escape. And you want to predict it since that means you can smack him around after he uses it during cool down. Second, is that he's one of the very few enemies that guard consistently. On the other hand, if you know how to use Dash attacks, its possible to take off almost 3 life bars (99 HP or so) in one large chain. Yet on a third hand, if you lose momentum because he escapes, it can be difficult to hit him again since he's fairly quick and can get close to you upfront which means you'll keep running into his Guard. High Middle/Heavyish.
 Rocksteady: "You're walking the plank, Shell brains!"
HP: 128*
Threshold: 4
Fights with Bepop
Attacks -
Pierce - 12 damage. Steps forward and stabs with the rapier. Very good range and is difficult to approach unless you're Don. Knocks down on hit.
Ram - 24 damage. Charges quickly towards the location of the player. Only usable after Bebop swaps out. Noticable cool down after use, where the player can walk up to him as he is bouncing back from hitting the wall. Some start up is also noticable. Knocks down on hit.
Swap - Forces Bebop to take on point
 Bebop:
 HP: 128*
Threshold: 4
Fights with Rocksteady
Attacks -
Whip - 12 damage. Runs forward and whips his rope. Medium range.
Kick to the shins - 6 damage. Kicks quickly. Used only at short range. Quick, and can be chained together twice for 12 damage total.
Swap - Forces Rocksteady to take on point
Comments:
IT'S BEPOP AND ROCKSTEADY. How competent do you think they are? As you probably guessed, not very. This fight would be a lot scarier if it wasn't for the way its conducted. Neither Bebop or Rocksteady will gang up on you until one of them is down to one life bar (~33 health). In other words, you can take them on one at a time as they decide to swap positions with each other, making this easier than it should be otherwise. At which point when they do try to gang up on you, it's too late for it to make too much of a difference.
An important note about this battle in game. If either Bebop or Rocksteady go to 0 HP, they will automatically destroy each other. So although they have 128 HP each, their current HP is only as high as the weaker member. Further note, if you attack Bebop or Rockstead when they are not on point, they will have a threshold of 1 and automatically counter after 1 hit with Pierce/Whip. Play by the rules kiddies! Light.
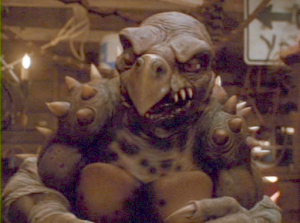
 Leatherhead: "Oh goodie, fresh turtles for lunch!"
HP: 172
Threshold: 3
Attacks -
Punch - 15 damage. Poor range. Uses this as his primary attack after Knife throw or Lobster throw. Knocks down on hit.
Knife throw - 3 damage per knife. Leatherhead moves up or down and continues to throw them until he reaches the end of the field. The knives have infinite horizontal tolerance. Used after Mad Dashing to one side.
Lobster throw - 2 damage. Throws 3 lobsters at you, one at a time. The lobster can be hit back to Leatherhead, which if it hits him, will immobolize him for around 5 seconds. This means you can basically set up a huge attack combo on him, although for only 3 hits. If it his you, you'll be immobolized for 3 seconds or so. Used after Mad Dashing to one side.
Tail Swing - 15 damage. Used as an Anti-air if you attempt to jump attack him while he's using either Knife Throw or Lobster Throw.
Mad dash - 15 damage. Gets onto the ground and rushes quickly to the other side of the field from where he was at. Invincible until end of the move. Noticable start up. Used as an Escape only. Knocks down on hit.
Barrel Drop - 30 damage. Appears once Leatherhead loses half his health. Leatherhead cannot actually summon barrels at will - they'll only drop during a Mad Dash. Knocks down on hit.
Comments:
Way too many damn attacks. Hilariously? In game, he suffers from the fact that he's completely patternized, making it easy to predict what he's going to do and strike him. His punch has too little range (it gets outranged by Raph's Attack#1) so it's typically waiting for him to use one his throw attacks, then strike him with superior range, dodge his Mad Dash and repeat. The barrels don't tend to help him since they are positioned to drop in randomized places that 99% of the time is not within your path (good thing that). Also, he loves to suicide in game with Lobsters. Light/Middle.
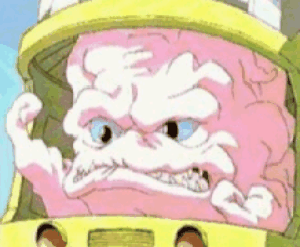 Super krang: "Face the wrath of Super Krang!"
HP: 192
Threshold: 4
Attacks -
KRANG SMASH - 6 damage. A double overhead hammer smash.
Android KYICK - 24 damage. Winds up a forward kick that propels him forward greatly. Knocks down on hit.
Missiles - 15 damage. Launches 5 missiles from the Android's chest. Has infinite horizontal tolerance. Knocks down on hit.
Explosives - 6 damage per explosive. 2PBO. Used once when he's down to ~66 HP, used again when he's down to ~15. Launches multiple explosives from his mouth. Invincible on use.
Retreat - Dash over to one side quickly. Used as an Escape.
Comments:
Has a messed up hit box. If you hover above him, you can actually strike him despite the fact you're not actually hitting him. Most of his attacks aside from SMASH are highly telegraphed due to their start up. In fact, his SMASH is really how he gets a large portion of his damage done against everyone...except Don. There's actually a spot you can stand with Don and just keep hitting attack and he'll never be able to hit you with the Smash attack. In addition, he'll never Retreat since he's constantly countering. Everyone else just uses the hover trick, so yeah, he sorta fails in game. Light/Middle of some sort I assume.
 Krang "You shell heads are dead!"
HP: 128
Threshold: 3
Note: Krang's attacks have his craft at different heights, which makes it such that it is difficult to drop a combo on him.
Attacks -
Bubble blast - 18 damage. Some start up time, fires a stream of bubbles that traps a turtle.
KRANG SMASH - 24 damage. Krang drops his craft from high up multiple times to crush puny turtles. Noticable recovery after each smash
Vanish - Used as an Escape after a series of attacks or as a threshold.
Summon Robot Walker - Drops 4 Robot Walkers to attack. Krang disappears as long as more than 1 Robot Walker is on the field. He can use this in combination with another attack after losing half his health.
Robot Walker
HP: 3
Threshold: N/A
Attacks -
Electic trap - 6 damage. Has infinite horizontal tolerance. Some start up time.
Comments:
Krang moves around a lot, and pretty quick, so its difficult to unload a large combo on him. How you want to hold him to this is up to you. In addition, Krang can fly his craft at a height (permanently!) where he can't be struck by melee or rush attacks after losing around half his HP. Pretty decent. Along with decent damage. Holy crap, someone decent? Blasphemy. Some form of Heavy.
 Super Shredder "Turtle soup! My favourite!"
HP: 248
Threshold: 5
Attacks -
Invoke - 6 damage. Conjures up a flame around him, making him invincible temporary. Only damages if you are around him when the flames appear. Needs to be used in order to use the following three attacks.
Flame trail - 12 damage. Creates a trail of fire directly in front of him.
Anti-air Ice beam - 15 damage. Fires a stream of ice energy into the air. Stops jumps attacks.
Anti-Mutagen - Fires a green fireball that instant kills the player if it hits. Infinite horizontal tolerance.
Teleport - Moves to another spot, usually within the vicinity of the player. Used as an Escape and after every Invoked attack.
Comments:
Well the final boss of the game and certainly the most threatening. Anti-Mutagen, if nothing else, means you always have to be on your toes, even though it only flies in a straight line. On Hard, the need to use Invoke before attacking doesn't matter as much because he attacks sooooooooo fast. You literally can't run up to him. Since he'll easily have moved to another spot with Teleport. In fact, he can only be struck during an attack and this window is very small on Hard. In game, you get around this either by using an attack that has invicibility frames during Invoke so you can strike him right as the flames drop OR, you dive kick at him (66% chance each time) to catch him off guard during the period between his attack and Invoke. Damage wise, he's not that special but the speed is just nuts. Heavy.


